


A homeowner who used our tester recently shared how difficult it was to identify breakers in their remodeled home due to inaccurate labeling.
Flipping breakers one by one wasn't just frustrating — it disrupted appliances they didn't want to power down. With a circuit breaker finder, they were finally able to speed up the process and eliminate the risk of accidental shutdowns.
The homeowner also told us they wished there was a more detailed, step-by-step guide — something that could help them double-check whether they were using the device correctly or missing any important safety tips.
If you’ve ever wondered whether you’re using a circuit breaker finder the right way — or you simply want to make sure you're getting the most out of it — this guide is for you.
Whether you’re a hands-on homeowner or a professional electrician, we’ll walk you through each step of the process so you can work quickly, safely, and with confidence.
How to Use a Circuit Breaker Finder in 5 Steps
Before we begin, it's important to understand the two main parts of a circuit breaker finder:
Transmitter:
- Plugs into the outlet, light fixture, or device you want to trace
- Sends a signal through the electrical circuit
Receiver:
- Used at the breaker panel
- Detects the signal sent by the transmitter when placed near the correct breaker

Once you're familiar with these two components, using a circuit breaker finder becomes a simple and efficient task.
We can now walk through the step-by-step process of using a circuit breaker finder, using KAIWEETS KT301P as a guide.
Step 1: Plug the Transmitter into the Outlet
To start using your circuit breaker, switch the transmitter on using the switch button, which turns the light on. Then plug the device into the outlet you want to match to its circuit breaker. Plugging the transmitter into the outlet automatically turns on the bright LED light that indicates your transmitter is energized. Plus, you get the circuit's voltage reading on the LCD screen, providing you with more details about the circuit.

Step 2: Turn On the Receiver
Now that the transmitter is plugged in and emits a signal, go on to receive the signal at the circuit breaker box.
Start by turning on the receiver using the switch button. Switching the receiver displays key information about the device, such as the signal sensitivity and battery usage.

Step 3: Run the First Scan (Learning Mode)
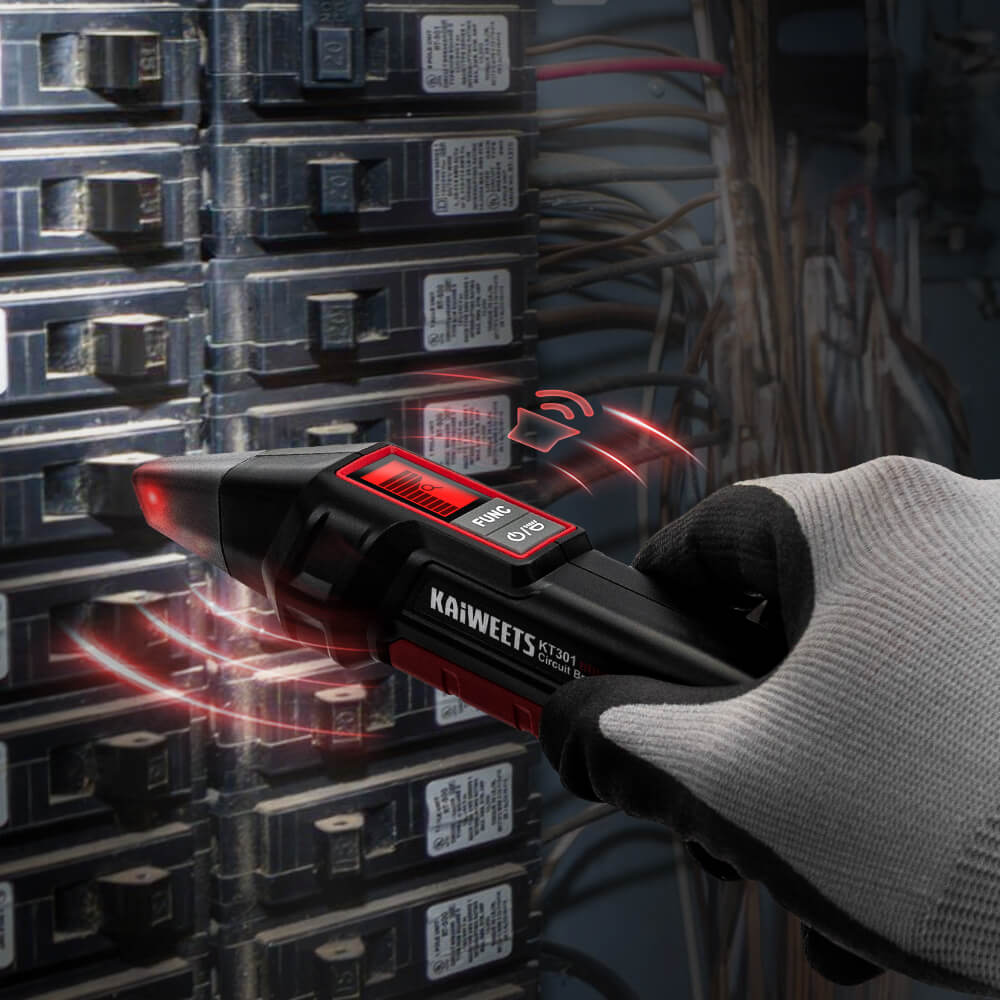
Start the first scan by short-pressing the "FUNC" button to put the receiver in the learning mode. In this mode, the receiver begins reading signal patterns from the panel. Slowly move the receiver across the breakers, with the sensor pointed directly at them. You’ll hear a continuous tone throughout the scan. As you pass over a potential match, the signal strength on the display will increase, the indicator light will turn red, and the beeping will become more rapid. These signs help you narrow down the likely breaker, but they don’t confirm it yet — a second scan is needed to verify the correct one.

If you are working in a dark area, turn on the light by short-pressing the light button on the receiver. Plus, the NCV mode lets you scan the panel without the receiver coming in direct contact with the circuit breakers. Long-press the "FUNC" button on the device to switch it to the NCV mode.
Once you finish the first scan, simply pull the receiver away from the panel and pause for about 3 seconds. This brief break allows the device to register that the learning scan is complete — you can now proceed with the second scan.
Step 4: Perform the Second Scan to Identify the Breaker
The second scan is where the magic happens. The second scan is where you locate the correct circuit breaker.
Unlike the first scan, which may give you general feedback throughout the panel, the second scan is where the receiver delivers a much more definitive response. As you approach the correct breaker, the signal strength bar on the display will spike, the indicator light will turn solid red, and the beeping will become sharper and faster. These stronger cues confirm that you’ve found the breaker.
Step 5: Confirm and Switch Off the Correct Breaker
Now that you’ve identified the correct circuit breaker, you can mark it for future reference, switch it off, and remove the transmitter from the outlet. The circuit is now de-energized, and you’re ready to begin work safely.

For extra peace of mind, use a non-contact voltage tester to confirm the outlet or fixture is no longer live before starting your task.
How to Find circuit breaker for Light switch
Since circuit breaker finders' transmitters are designed to plug into a power outlet, you might be concerned about using your device with a light fitting. Thankfully, some circuit breaker brands package their products with a socket adapter that allows you to use the device on light fixtures.

To use a circuit breaker with a light fitting, start by switching off the light fixture at the wall switch and replacing the light bulb connected to it with the socket adapter. Continue by plugging the transmitter into the adapter and switching on the light fixture at the wall. This brings the transmitter's light on as though you plugged it into a regular outlet.
From here, follow the same steps outlined earlier to identify the correct breaker using the receiver at your panel.
Tips when using a circuit breaker finder
Be Safety Conscious
Remember that you don't need to touch the circuit breakers in the panel box to test them. Professional circuit breakers with the NCV (Non Contact Voltage Detection) mode ensure beginner DIYers can read the breakers without the device getting in direct contact with the breakers.
Ensure the Outlet or Fixture Is Powered
A circuit breaker finder's transmitter requires power from the outlet to function. Failure to power the outlet or fixture prevents the transmitter from sending a signal, meaning your receiver has no signal to receive.
Remove the Receiver's Battery during Long-term Storage
Storing your device with the battery intact in the receiver for a long time drains the battery juice. This may leave you disappointed the next time you want to use your device, and you may need to replace the battery.
Hence, you want to remove the battery if you are not using the device anytime soon.
Scan at a Steady, Moderate Pace
When moving the receiver across the breaker panel, avoid going too fast or too slow. Scanning too quickly may cause the device to miss the signal, while scanning too slowly can sometimes pick up stray interference. A steady, moderate pace ensures more accurate detection of the correct breaker.
Recommended Circuit Breaker Finder
KAIWEET KT301P
KAIWEETS KT301P is one of the best circuit breaker finders on the market. With its outstanding features, you won’t regret adding it to your electrical toolkit — it offers one of the most comprehensive sets of functions available today.
Key features of the KT301P Circuit Breaker Locator include:
NCV Mode
You can activate the NCV (Non-Contact Voltage Detection) feature by long-pressing a button on the receiver. This feature ensures your receiver doesn't come into contact with the circuit breaker or fuse to receive the transmitter's signal.
Built-In Flashlight
Working in an area with low light can expose you to danger and make using your breaker finder time-consuming. This is why the KT301P breaker locator has a built-in flashlight to illuminate your work environment.
LCD Screen
As discussed above, working with a circuit breaker locator with an LCD screen helps provide the necessary information about the circuit you are working on. Thankfully, KT301P offers an LCD screen for clear, easy-to-read results.
Value Retention
One outstanding feature of KT301P's transmitter is how it retains information on the LCD display screen even after unplugging it from the outlet. Except you switch the transmitter off, the screen only shuts down automatically after 15 minutes of no power.
3-In1 Transmitter Functionality
KT301P Circuit Breaker Finder not only lets you find the corresponding circuit breaker of a power outlet; it also performs other functionalities, such as voltage testing, GFCI testing, and wiring accuracy checks.
Ease of Use
With the design of the KT301P, it is evident that KAIWEETS had the beginner users in mind. Using KT301P is easy and fast, thanks to more accurate scanning with clear visual and audible indicators.

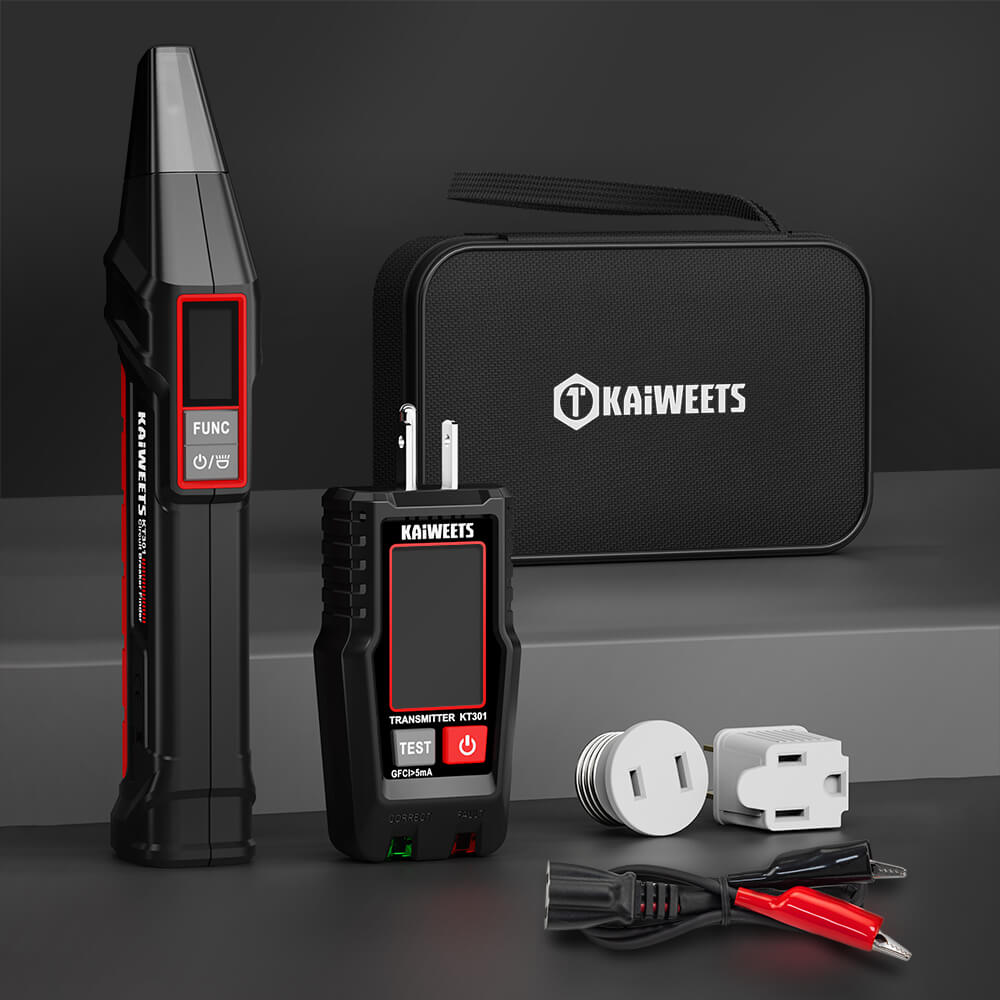
KAIWEETS KT301P Circuit Breaker Finder
The KAIWEETS KT301P is a 3-in-1 device that combines a digital circuit breaker locator, outlet tester, and GFCI tester. It features an LCD display, NCV mode for non-contact voltage detection, and a built-in flashlight for safe and efficient electrical work.
Full specs & features.
Conclusion
Knowing the right way to use a circuit breaker finder saves you time and protects you against hazards. With the proper steps, you can quickly identify which breaker controls any part of a circuit — whether it’s an outlet, a light fixture, or another connected device.
FAQs
Can a circuit breaker finder work on a dead outlet?
A circuit breaker finder cannot work on a dead outlet. Remember that the transmitter doesn't use a battery but power from the outlet or light fixture to send a signal. Hence, you may look for another device when working with a dead outlet.
Why do I need a circuit breaker finder?
A circuit breaker finder helps save time and effort when locating a circuit breaker that controls an outlet, such as when troubleshooting electrical issues.
What types of circuit breaker finders are available?
Circuit breaker finders are available in two options: basic finders and advanced finders. Basic circuit breaker finders can only detect signals, while advanced breakers can perform other functions, such as voltage reading and identifying circuit characteristics.
Can I use a circuit breaker finder for more than just outlets and light fixtures?
Yes, you can. With the right adapters — such as alligator clips — you can test hardwired devices too. For example, the KAIWEETS KT301P comes with multiple adapter options to handle various testing scenarios.

Leave a comment
All comments are moderated before being published.
This site is protected by hCaptcha and the hCaptcha Privacy Policy and Terms of Service apply.