


Un niveau laser est un excellent outil à avoir lorsque vous marquez un plafond. Cela rend le travail beaucoup plus facile et plus soigné que si vous essayiez de le faire à main levée. Dans cet article, nous expliquerons comment utiliser un niveau laser pour marquer un plafond. Nous fournirons également quelques conseils sur la manière d'obtenir les marques les plus précises possibles. Commençons!
Comment obtenir le niveau laser le plus précis pour mesurer un plafond ?
La précision est primordiale lorsqu’il s’agit de mesurer un plafond avec un niveau laser. Pour vous assurer d’obtenir les résultats les plus précis possibles, vous devez suivre plusieurs étapes.
- Choisissez le type de niveau laser adapté à vos besoins : différents types de niveaux laser ont des niveaux de précision et des spécifications différents. Avant d'acheter, faites vos recherches et choisissez un modèle qui possède la précision dont vous avez besoin pour votre projet.
- Utilisez une surface solide et plane comme point de départ : Pour obtenir une lecture précise, vous devez vous assurer que la base de votre niveau laser est installée sur une surface stable et plane. Cela garantira que les mesures prises avec votre niveau laser sont précises et cohérentes tout au long du processus.
- Installez des trépieds ou des supports : Même lorsque vous travaillez sur des surfaces planes, il est important d'utiliser des trépieds ou des supports pour vous assurer que le niveau laser reste en place pendant son utilisation. De cette façon, vous pouvez être sûr que toutes les mesures prises seront basées sur une surface plane et stable.
- Assurez-vous que toutes les batteries sont chargées et fonctionnent : Si vous utilisez un niveau laser fonctionnant sur batterie, assurez-vous que toutes les batteries sont complètement chargées et en bon état de fonctionnement. Cela garantira que toutes les lectures prises avec l’appareil seront exactes.
- Vérifiez les obstructions : avant de prendre des mesures, jetez un œil autour de votre espace de travail pour vous assurer qu'aucun objet ne bloque le faisceau laser. Ceux-ci peuvent entraîner des lectures inexactes, il est donc important de les éliminer au préalable.
En suivant ces étapes, vous serez en mesure d'obtenir les résultats les plus précis possibles lorsque vous utiliserez un niveau laser pour mesurer votre plafond ou d'autres surfaces. Avec une planification et une configuration minutieuses, vous pourrez obtenir des mesures fiables et précises à chaque fois !

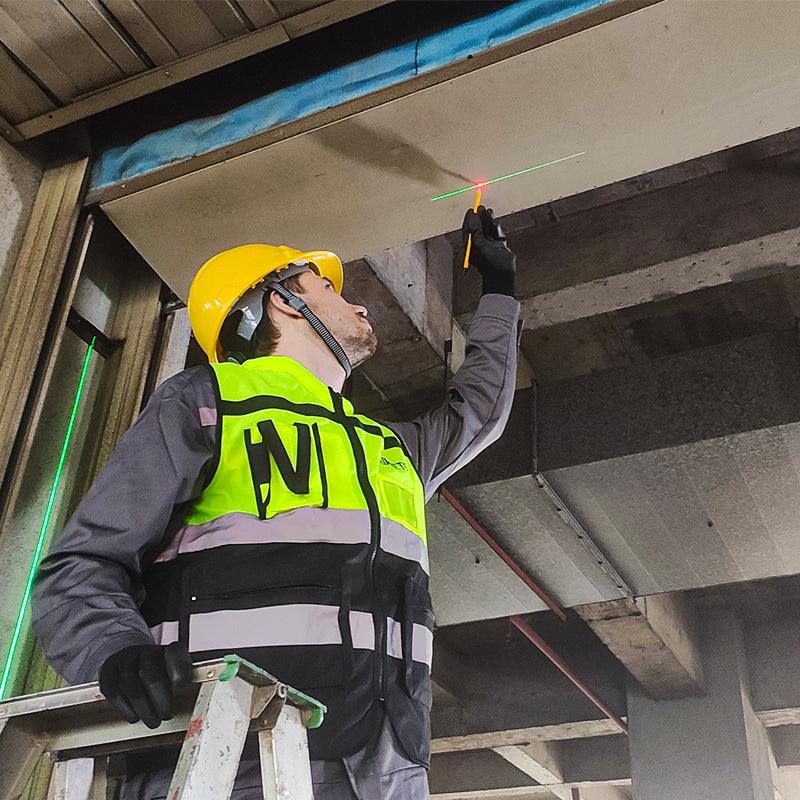
Guide étape par étape - Comment utiliser le niveau laser pour marquer les plafonds
Le niveau laser pour marquer les plafonds est un excellent outil pour assurer une couverture uniforme de votre plafond. Avec la bonne configuration, il peut vous aider à mesurer et à marquer des surfaces avec précision et exactitude.
nous utiliserons à cet effet un niveau laser en croix.
Voici un guide étape par étape utilisant le niveau laser pour marquer les plafonds :
- Tout d'abord, assurez-vous que le niveau laser est solidement monté sur une surface stable et correctement nivelé conformément aux instructions du fabricant.
- Positionnez le niveau laser de manière à ce que la ligne transversale coupe les points où vous souhaitez marquer le plafond. Assurez-vous que vous pouvez le voir clairement depuis votre poste de travail ou votre échelle.
- Placez le ruban de peintre aux deux extrémités de la ligne et assurez-vous qu'il est droit et bien fixé contre la surface du plafond, sans espace entre celui-ci et la jonction mur/plafond.
- Utilisez un crayon ou un marqueur pour tracer le long d'un côté du ruban de peintre, en suivant son bord précisément aussi loin que nécessaire. Retirez ensuite le ruban adhésif et tracez de l’autre côté de la ligne.
- Enfin, utilisez une règle pour vérifier l'exactitude afin de vous assurer que vos lignes sont uniformes d'un bout à l'autre.
Assurez-vous de prendre les mesures de sécurité appropriées lorsque vous utilisez un niveau laser pour marquer les plafonds, car cela peut être dangereux s'il n'est pas manipulé correctement. Portez toujours des lunettes de protection et suivez attentivement les instructions du fabricant lors de l'exécution de cette tâche. Avec une planification minutieuse et de la patience, vous ne devriez avoir aucun problème à obtenir des résultats parfaits en un rien de temps !
Erreurs courantes commises par les gens lorsqu'ils utilisent un niveau laser pour marquer les plafonds :
- Sans tenir compte de la hauteur du plafond :
Le niveau laser doit être placé à la même hauteur que la surface du plafond. S'il est positionné trop bas, vos mesures ne seront pas précises.
- Utilisation de paramètres incorrects :
Assurez-vous que vous utilisez les paramètres corrects sur votre niveau laser pour garantir la précision. Par exemple, si vous avez besoin de lignes verticales, assurez-vous que le faisceau est réglé sur un angle perpendiculaire et utilisez un fil à plomb pour vérifier ce réglage avant de commencer le travail.
- Mauvais positionnement des points de référence :
Vos points de référence doivent toujours être référencés les uns par rapport aux autres pour obtenir une mesure et une disposition précises des lignes sur la surface de votre plafond. Lorsque vous mesurez du sol au plafond, assurez-vous que tous les points de référence (par exemple le mur et le sol) sont alignés les uns avec les autres pour obtenir la lecture la plus précise possible.
- Ne tient pas compte des obstructions :
Avant de commencer les travaux, assurez-vous d'avoir pris en compte tous les obstacles qui pourraient interférer avec votre ligne de vue ou votre précision lors du marquage de vos lignes de plafond (par exemple des meubles). Écarter ces éléments avant de commencer le travail peut permettre de gagner du temps et de garantir l'exactitude.
- Ne pas vérifier les mesures :
Il est important de toujours revérifier vos mesures avant de configurer le niveau laser afin de ne pas perdre de temps à le configurer de manière incorrecte ou à obtenir des résultats inexacts. L'utilisation d'un ruban à mesurer est un moyen simple de le faire et garantira la précision lors de la configuration du niveau laser.
En suivant ces conseils, vous pouvez éviter de commettre des erreurs courantes lors de l'utilisation d'un niveau laser pour marquer les plafonds et garantir l'exactitude de vos mesures. Avec de la pratique et de la patience, vous deviendrez bientôt un expert dans l'utilisation de cet outil pratique !
Questions fréquemment posées:
A quoi sert un niveau laser pour marquer les plafonds ?
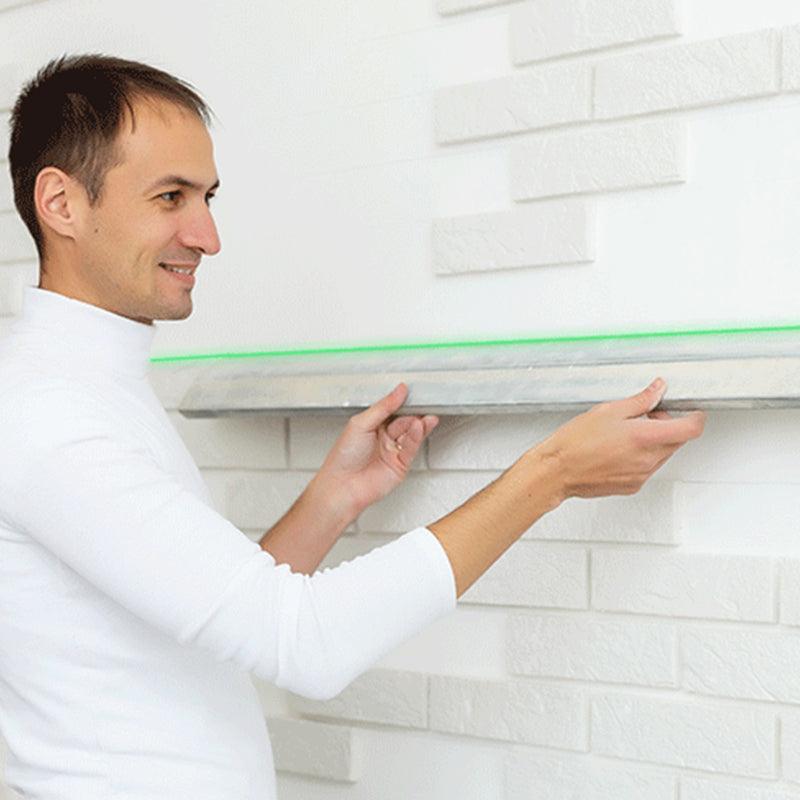
Un niveau laser pour marquer les plafonds est utilisé pour tracer des lignes et faire des marques sur la surface du plafond. Il peut être utilisé pour aligner des objets, tels que des carreaux ou des panneaux, afin de garantir une installation précise. Les niveaux laser aident à réduire les erreurs et à gagner du temps en fournissant un point de référence exact à partir duquel les mesures peuvent être prises.
Comment fonctionne un niveau laser pour marquer les plafonds ?
Un niveau laser pour marquer les plafonds utilise un faisceau laser projeté sur la surface du plafond. Le faisceau peut être ajusté de manière à pointer à n'importe quel angle nécessaire et restera en place jusqu'à ce qu'il soit à nouveau déplacé. La ligne créée par le faisceau permet aux utilisateurs de mesurer et de tracer avec précision des lignes droites.
Quels sont les avantages d’utiliser un niveau laser pour marquer les plafonds ?
L’utilisation d’un niveau laser pour marquer les plafonds présente plusieurs avantages, notamment la précision, la rapidité et la commodité. En disposant d'un point de référence exact à partir duquel les mesures peuvent être prises, les erreurs peuvent être minimisées et le temps d'installation réduit. De plus, les niveaux laser sont faciles à utiliser et peuvent être déplacés rapidement si nécessaire.
Y a- t-il des précautions de sécurité à prendre en compte lors de l'utilisation d'un niveau laser pour marquer les plafonds ?
Lorsque vous travaillez avec un niveau laser pour marquer des plafonds, il est important de prendre des précautions de sécurité de base telles que le port de lunettes de protection. De plus, le faisceau ne doit jamais être pointé directement vers le visage ou les yeux d'une personne, car cela pourrait causer des dommages permanents. Enfin, le niveau laser doit être stocké dans un endroit sécurisé lorsqu’il n’est pas utilisé.

Conclusion:
L'utilisation d'un niveau laser, comme démontré dans cet article, est un moyen simple et précis de marquer un plafond. Cette méthode vous aidera à garantir que vos mesures sont précises, permettant une finition plus professionnelle. De plus, l’utilisation d’un niveau laser réduit le temps nécessaire pour travailler sur le projet, le rendant encore plus efficace et rentable. Avec les bons outils et connaissances, tout propriétaire ou entrepreneur peut entreprendre ses projets de plafond en toute confiance. Pour plus d'informations, veuillez cliquer sur KAIWEETS .

Laisser un commentaire
Tous les commentaires sont modérés avant d'être publiés.
Ce site est protégé par hCaptcha, et la Politique de confidentialité et les Conditions de service de hCaptcha s’appliquent.