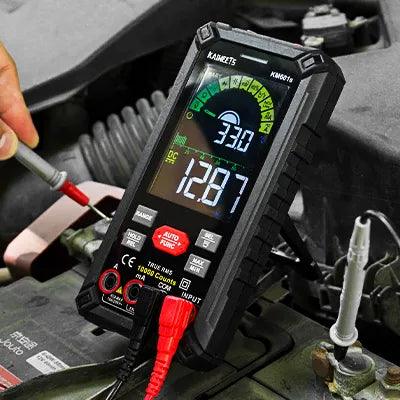
A multimeter is an essential gadget when checking electrical systems. A multimeter is a handheld device that can measure voltages, currents, and resistances in electronic circuits with incredible accuracy—but only if properly calibrated and in working order. That is why it is essential for anyone who uses a multimeter regularly, whether you are an electronics enthusiast or a professional electrician, to understand how to measure the accuracy of their Multimeter. In this blog post, we'll walk you through the steps to do it correctly and efficiently.
Understand the basics of a Multimeter:
A multimeter is an essential tool for any electrician or hobbyist. It allows you to measure volts, amperes, and ohms accurately and quickly.
When using a multimeter, you must familiarize yourself with the various settings and measurements that can be taken. The most popular setting for measuring AC (alternating current) voltage is VAC, while DC (direct current) voltage is measured with VDC. It would help if you also understood resistance measurement; this is done by selecting Ohms on the dial. Finally, Amps measure electrical current in both AC/DC modes.
To ensure accuracy and safety when using a multimeter, always select the correct range value and ensure no power goes to the device you are measuring. Additionally, it is important never to touch two bare wires simultaneously as this can cause a short circuit or even an electric shock.
Proper multimeter use can save you time and effort in diagnosing electrical problems. It provides accurate readings so that you know exactly what's wrong with your wiring and helps you take the appropriate steps to fix it. So if you're working on any electrical system, ensure a multimeter is part of your toolkit!
Make adjustments as necessary to ensure accuracy:
Always check the accuracy of your multimeter readings. Most digital multimeters feature a calibration setting, so it's essential to make sure that you adjust this accordingly to ensure accuracy.
- When working with high voltage, use an isolation transformer or another protection device to prevent shocks. This will help ensure the safety of yourself and others in the area.
- To get accurate readings, select the correct range for the measurement. If necessary, compare several measurements at different ranges for more accurate results.
- Ensure all connections are secure when using probes on test points to measure current or resistance values. Loose connections can lead to incorrect readings due to false signals caused by stray electrical signals.
- Use a multimeter with digital inputs and outputs for the most accurate measurements. This makes it easier to determine the reading and eliminates any potential errors caused by analog circuitry.
Following these simple steps will help ensure accuracy when using a multimeter for measurement and troubleshooting activities. Take the necessary precautions when dealing with high voltages, secure all connections, select the correct range for your readings, and choose a digital multimeter, if possible, for more accurate results. With this knowledge, you can get accurate readings from your Multimeter every time!
How Do I Test If My Multimeter Is Accurate?
Accuracy is one of the most important characteristics when using a multimeter. Any readings taken will be unreliable if you don't have faith in their accuracy, which could lead to significant difficulties if you utilize them for electrical operations. Testing and calibrating your Multimeter regularly is critical to ensure it is as accurate as possible. Here's an easy-to-follow guide on how to accomplish it:
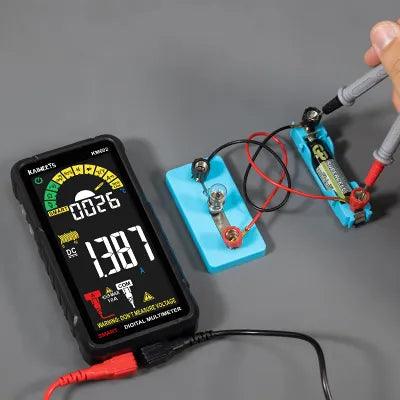
- Start by getting a known voltage source, such as a battery or an AC/DC adapter with the correct rating for your Multimeter. This will provide you with an accurate reference to compare readings against.
- Connect the positive side of your voltage source to one terminal on your Multimeter and the negative side to another terminal. Select the appropriate setting, either DCV (for direct current) or ACV (for alternating current).
- Take a reading from your Multimeter and compare it to the value of your known voltage source; if they match within tolerance, then this is a sign that your Multimeter is working correctly for this kind of measurement. If not, check all connections and wiring before proceeding further.
- Repeat steps 2 and 3 for different voltage levels, including 0V (ground test). If readings are constantly out of tolerance, it could indicate that your Multimeter needs to be recalibrated.
By following these simple steps, you can ensure your Multimeter is accurate and working correctly, giving you confidence in its readings. With regular calibration and maintenance, you can ensure your Multimeter always provides reliable readings for years.
How can I tell if my Multimeter is bad?
Generally speaking, multimeters are built to last and, with proper maintenance, can last for many years. However, there may be times when a multimeter malfunctions or stops working altogether. The best way to check if your Multimeter is bad is to perform some basic tests.
- First, you should check the accuracy of the readings displayed by your device. To do this, use a known good source such as an AC adapter power supply tested with another meter first and then tested with your old Multimeter. If the readings differ significantly, it might indicate that your Multimeter has gone bad or requires calibration.
- Second, inspect the case and wiring of your device for any signs of damage or wear and tear. If the protective case has been cracked or wires are exposed, this could indicate that your Multimeter may need servicing.
- Finally, check for blown fuses and shorted-out components in the device's circuitry. Blown fuses indicate a power issue that can damage a multimeter quickly. Additionally, if you notice any discoloration on the circuit boards due to overheating, there is likely an underlying problem with your device, and it should be serviced immediately to prevent further damage.
If you have determined that your Multimeter is malfunctioning, contact an authorized service center for repairs. In most cases, they will be able to identify and repair any issues with the device. If your Multimeter is beyond repair, it may be time to look for a new one. You can ensure that your Multimeter will last many years with the right care and maintenance.
Frequently Asked Questions:
How do I test if my Multimeter is accurate?
Testing a multimeter for accuracy requires an external reference, such as a resistive decade box or another known-accurate device. First, set the range of your Multimeter to the appropriate setting for what you are testing. Then connect it to the reference source, taking note of polarity. Finally, take a reading from your Multimeter and compare that with what is indicated on the reference source - if they match within their respective tolerances, then your Multimeter is accurate.
Are there any other ways to check my multimeter accuracy?
Yes - in addition to using an external reference source, you can use another multimeter as a reference. To do this, set each Multimeter on the same range and take readings from both meters simultaneously - if they match within their respective tolerances, then both meters are likely to be accurate.
What safety precautions should I take when testing with a multimeter?
Always observe basic electrical safety precautions when working with a multimeter, such as ensuring all power sources are disconnected, wearing protective clothing and eyewear, ensuring all connections are secure, and never touching exposed wires.
How often should I test my Multimeter for accuracy?
Most manufacturers recommend checking the accuracy of your Multimeter at least once a year or after any major repair work to ensure it is still operating within its specified accuracy range. Additionally, you may want to check the accuracy periodically if you use your Multimeter frequently.
How can I check the accuracy of my multimeter readings?
The best way to test the accuracy of your Multimeter readings is to use a known reference value and compare it to the reading taken from your device. If the two values match, you can trust that your device provides accurate readings.
Are there any risks associated with calibrating a Multimeter?
Yes, some risks are associated with calibrating a digital or analog multimeter, as this involves connecting it to an external power source. To minimize the risks, read the instructions closely and follow all safety protocols when calibrating your Multimeter.
What Other Tips Or Advice Should I Consider?
It is essential to ensure your Multimeter works well before calibrating it. Make sure that all of its components are securely connected and that its batteries are fresh. Also, take special care when using a digital multimeter as it can be more sensitive to changes in temperature or environment than analog devices. Lastly, always use caution when handling electrical equipment and unplug devices before connecting with your Multimeter.
Conclusion:
Finally, Testing your Multimeter regularly is critical to ensuring accuracy and reliability. You can check the accuracy of your multimeter results by using a voltage reference or an ohm-meter. Checking the accuracy of your Multimeter is a crucial step before beginning any electrical work or repair. You should repeat these steps regularly to ensure your readings remain correct. When in doubt, go to your Multimeter's user manual for more information on how to test its accuracy. Taking the time to do so will protect you from future mistakes!













Leave a comment
All comments are moderated before being published.
This site is protected by hCaptcha and the hCaptcha Privacy Policy and Terms of Service apply.