How to use a Multimeter in 2022
The Definitive Guide
Today you are going to learn:
From which components multimeter been made
The main functions of multimeter
How to use a multimeter to solve different problems
The best multimeters to get started with in 2022


What is a Multimeter
In order to learn how to use a multimeter,
We need to have a basic concept of the multimeter first
Then understand the evolution of multimeters
Let's get start it
Description of Multimeter
Multimeters are small, lightweight, and portable testing devices for measuring and testing electrical/electronic circuits, switchboards, cars, appliances, and more. All the modern-day multimeters are highly flexible in working, multipurpose in features, and thus are extremely valuable for a variety of functions with petite construction and trivial knowledge required operating them by anyone.
Application
Scenarios of Multimeters
For students, multimeters are a portal to explore the complex circuits later on. The basic functions of a multimeter make it easier to test AC/DC voltages, current, resistance, diode testing, and continuity quite comfortably without having to worry about the complexities.
For household usage, multimeters assist in testing blown fuses, car battery voltages, and capacitance with ease and aptness. Multimeters are also great tools for engineers, helping them with quick troubleshoots, complicated circuits, alongside a fine accuracy count.

Evolution of Multimeters
Multimeters have evolved for years, from bulky immovable analog machines to the handy ones with lightweight build and multiple functionalities. The recent ones have been more spectacular, owing to their slim design, backlit LCD displays, and automatic functions. Of them all, the analog meters are obsolete as of 2022. The second-generation digital multimeters are cost-effective, handy, and compact in construction, and are preferred in households, laboratories, and at school.
Parts of a Multimeter
Now you have a basic concept of multimeter
So let's take a look at what parts it is made of
And how does its part change over time
After understanding the characteristics of each part, we can start our tutorial on how to use a multimeter.

Multimeters are modest in setup and quite handy in quick-testing household electronic gadgets for cars and industrial panels, thanks to their clutter-free structure and uncomplicated wiring setup. The basic components inside a digital multimeter include:
Display
All the standard multimeters have a single-strip LCD display with four to ten figured numbered screen. However, the smart digital multimeters comprise colored backlit RGB LCD screen with better resolution and denser display counts. Also, the colored DMMs have on-screen controls with manual and automatic controls and countless other choices than are available with the basic ones.

Selection Knobs
A selection knob is the heart and soul of a multimeter. The knob can be rotated clockwise / anticlockwise to turn on/off the meter and to select the required measurement mode. A selection
knob rotates 360 degrees with resistance/voltage/current readings separated by the decimal places accordingly with their respective multimeter models.

But just as the brilliant Nokia was replaced by IPhone at the time, ordinary heavy multimeters are gradually being replaced by lighter, thinner, more portable, and smarter digital multimeters.
Take Kaiweets' KM601, which retains the function of selecting the shape of the knob on the screen, but it is much lighter than a traditional multimeter.

Testing Probes
In general, there are three places for connecting probes in a multimeter. Of them, two can be connected at once for testing microcurrents, voltages, resistance, and continuity. The COM probe is always connected to the Ground when taking measurements. COM probe is conventionally the black cable (or the RED one) for user convenience.
The other probe i.e. the red (or the BLACK one) can either be connected to the FUSED port for micro-current, voltage, resistance, and diode testing, or to the UNFUSED port for measuring larger currents, up to 10A max.

How to Use a Multimeter?
Finally! You have reached the most practical section
In this section you will learn:
How to Test Car Battery
How to Revive a Blown Fuse
How to Measure Voltage, Resistance, Current and Continuity

A multimeter requires no special training as it takes a few minutes to understand the readings on the front knob and then you' re good to go. Connect the testing probes to COM and Live port, turn on the multimeter, and select your required testing range i.e. 200/2000/20k/20MΩ for resistances, AC or DC current and voltage mode, capacitances, or diodes etc.

After selecting the required range, connect the probes to the targeted circuit and jot down your readings before they fluctuate. For dead-accurate results, press the HOLD button on the front to
freeze the actual readings. HOLD button is provided in all the digital multimeters available online.
To get more optimized results, select the range to maximum when unsure about the readings. Note
that the 10A port is usually un-fused in basic versions. Avoid using the 10A port for longer durations
(not more than 8-10 seconds) when measuring high current circuits.
A few DMMs come with a user-friendly backlight for enhanced display at night or when there's not enough light surrounding the multimeter.
On the other hand, modern digital multimeters comprise always-on LCD display with night-light display adjusters for a comfortable viewing experience.

How to Measure Voltage with a Multimeter?
To measure DC voltage, plug in the RED and BLACK probes into the mAVΩ and COM ports respectively, and select the range between 200mV/2V/20V/200V/500V for DC readings in any required parameter. Now connect the end points of both the probes to the positive (+) and negative (-) terminals of a battery, sensor, or any DC circuit for results.

For AC voltage measurements, make sure to rotate the knob to AC Voltage range i.e. the one with a V followed by an AC wave. Select the appropriate range and then connect the probes to the neutral and live terminals of an AC circuit.

If the resulting voltages are higher than the set range, the multimeter will display “1” reading, which means that the meter is overloaded. Users are suggested to select a higher voltage range, i.e., 200V if you have already selected 20V range.
How to Test Car Battery with a Multimeter?
To test a car battery with a multimeter, rotate the knob to 20V DC and connect the probes to the negative and positive terminals of the car battery. Usually, red probe is attached to the positive (+) and the black one to the negative (-) terminal.

Before taking readings, make sure that the car battery is in resting stage for a few hours for accurate results. If the multimeter displays 12.6V, your car battery is doing great with all cells in perfect condition. If it's 12.2V, the battery is 50% charged, and if it's below 12V, it is time to replace your battery with a newer one. Similarly, to test the alternator with a multimeter, keep the engine running and connect the positive and negative probes to the car battery's positive and negative terminals in 20V DC range. If the readings are between 13.8V and 14.4V at idle RPMs, the car's alternator system is effectively charging the battery and other electrical processes inside it.

How to Measure Resistance with a Multimeter?
To calculate resistance, turn the knob to Ω and select your range accordingly. It is best to select the middle range for optimum results, and then rising it gradually afterwards. If the reading indicates “1” on the display, it's time to raise the resistance range.

How to Measure Current with a Multimeter?
Currents are measured by breaking the circuit and connecting probes in series between the wires. A great care must be taken when measuring AC/DC current. To measure current, it is advisable to use alligator clips for user safety instead of common probes that are used for measuring voltage and resistance. After the clips are safely connected, set your current range between 200 micro-Amp to 10A max. For a breadboard DC circuit, it's better to set the range on 200mA with the connecting probe on mAVΩ. For higher current readings i.e. up to 10A, place the probe in a 10A max port for added safety. If the current overloads, it will promptly blow out the fuse.

How to Measure Continuity with a Multimeter?
Continuity tests are essential for various hardware tests to check the resistance between two points. The continuity symbol is represented by a diode with sound waves emitting off it.
To check for continuity, set the knob to continuity mode and then place the testing probes to both the points being testing inside a circuit. If the resistance is negligible (a few ohms) between the points, the two ends are electrically connected, and a beep is produced. If there's enough resistance between both ends, no beep will be produced. To test if continuity works, connect both the probes together with continuity settings turned on. If that makes a beep, you are good to go.
Note that a few multimeters do not have continuity features turned on. It is better to check for a continuity function before purchasinga multimeter.

How to Revive a Blown Fuse in Multimeters?
Fuses blow off when current is measured using VCC to GND probes. The fuse inside the multimeter is blows out by heating up to 200mA. To rejuvenate a blown fuse, try the following steps: Open up the back of the multimeter with a mini screwdriver and remove the battery. Now, strip the internal circuit from the plastic body and find the 200mA fuse. After you've recognized the fuse, remove it with care and install a new one in its place. Now, fix the circuit inside the casing and place battery on top of it. Fasten the screws again and it will work now.

Top Recommended Multimeters in 2021
After you master how to use a multimeter
You will need a suitable multimeter
But everyone has different needs
Below we recommend several multimeters that meet different needs

Kaiweets KM312B

4000 Counts True RMS Meter
Smart Meter And Auto Ranging Meter
Could Switched To Manual Mode
Measuring Capacitance
NCV And Live Wire Detection
Bright Backlight & Flashlight
3 Years Warranty
CATIII 600V Overvoltage Safety
If you are looking for an affordable, mid-range digital multimeter for day-to-day tasks,
KAIWEETS KM312B digital multimeter is the one. The smart auto-ranging multimeter
delivers enhanced performance with its easy-to-use interface, backed with true-RMS readings for frequency, live wire, and
NCV detection with high-performance safety standards.
The CAT-III design endures high-voltage and current circuits without endangering the user. The lightweight build make
KM312B extremely portable for DIYers, household, and car owners. In addition, KM312B has a data retention memory and
low battery indicator for better experience whilst using the multimeter.
Kaiweets HT118A

6000 Counts True RMS Meter
Auto Ranging Meter
Could Switched To Manual Mode
Good Quality Probes
NCV And Live Wire Detection
LED Indicators For Correct Jacks
Bright Backlight & Flashlight
3 Years Warranty
Silicone Cover Case
CATIII 1000V And CATIV 600V Overvoltage Safety
Another great alternative in auto-ranging multimeters is KAIWEETS HT118A. It only weighs 1.36lbs and works fine for all the basic measurements and a few advanced features with improved accuracy and
better ergonomics overall. HT118A also has a special sensor for real-time temperature updates for labs and industries.
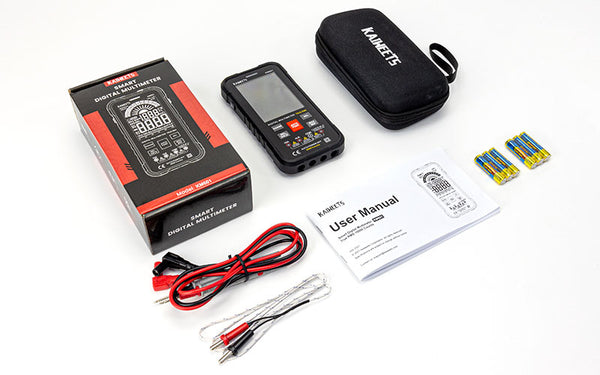
Kaiweets KM601

10000 Counts True RMS Meter
Smart Meter And Auto Ranging Meter
Could Switched To Manual Mode
Large Multi-Color LCD
Good Quality Probes
NCV And Live Wire Detection
LED Indicators For Correct Jacks
3 Years Warranty
Silicone Cover And Carry Bag
CATIII 1000V And CATIV 600V Overvoltage Safety
If you're into smart multimeters, KAIWEETS KM601 is a prodigious all-in-one DMM to take care of all the tasks possible with a multimeter. It has a large backlit LCD screen with colorful display, a long-lasting battery, true-RMS calculation, alongside NCV and Live Wire Detection.
Inside KAIWEETS KM601, there's also an on-screen temperature display, battery indictor, and
auto/manual button for real-time stats alongside dual ceramic fuses for heavy loads and user protection from high instantaneous currents and overvoltages.
Conclusion

The tutorial explained on how to use a multimeter in 2022, the components of a multimeter, the functions, and how to handle various voltages and current readings in great detail. Also, the article expounded on the best practices when testing voltages, current, diodes, continuity, and resistances safely and accurately in a circuit. The troubleshooting guide explains the dos and don'ts when measuring the values with a multimeter, changing the blown fuse, and analyzing car battery's health with a multimeter. When using a multimeter, it is important to select the range appropriately with the equipment being tested. If selected otherwise, overloads may occur. For household electrical problems, a mid-range digital multimeter works just fine. They measure voltages, current, resistance, diodes, continuity, and large AC loads. For industrial purposes, modern smart DMMs accurately scale voltages and other basic measurements together with NCV, live wire, and temperatures simultaneously with their multifunctional circuitries.