


An audio signal can be checked with a multimeter, but the meter will not show the complete waveform or reveal every type of distortion. It is most useful for checking AC signal voltage, DC offset, broken connections, and speaker resistance.
For a reliable test, use a steady sine-wave tone instead of music. You should also confirm that the signal frequency falls within your multimeter’s specified AC bandwidth.
What can a multimeter tell you about an audio signal?
A multimeter can confirm whether an electrical audio signal is present and measure its approximate voltage level.
Audio equipment converts sound information into a voltage that changes over time. The signal may be small at a line-level or headphone output. A power amplifier produces a much larger voltage to drive a speaker.
Depending on its functions, a digital multimeter can help you check:
- AC voltage produced by an audio output
- DC voltage or unwanted DC offset
- Continuity in cables, fuses, and connections
- DC resistance of a disconnected speaker
- Signal frequency if the meter includes a frequency mode
A multimeter does not display the shape of the signal. It also cannot accurately evaluate clipping, noise, or total harmonic distortion. Those checks normally require an oscilloscope or audio analyzer.
What should you check before measuring an audio signal?
Before testing, identify the output type and confirm that your multimeter is suitable for the expected voltage and frequency. If you are new to electrical measurements, first make sure you understand how to use a multimeter, including where to connect the test leads and how to select the correct measurement mode.
Check the meter specifications. Many handheld multimeters are designed primarily for mains-frequency measurements. Their accuracy may decrease at higher audio frequencies. A true-RMS meter can provide a more representative reading for some waveforms, but it must still be used within its specified bandwidth.
Identify the output connection. A line output, headphone jack, and speaker output are not measured in exactly the same way. Use the equipment manual or a suitable breakout cable to identify the correct terminals.
Confirm whether the output is differential. Many modern Class D amplifiers use bridge-tied outputs. In this design, neither speaker terminal should automatically be treated as ground. Measure across the two speaker terminals unless the manufacturer specifies another method.
Never place a multimeter in current mode directly across an audio output. The current input has very low resistance and can create a short circuit. Resistance and continuity tests must only be performed after the equipment is powered off and disconnected.
How do you test an audio signal with a multimeter?
You can test an audio signal by playing a steady tone and measuring the AC voltage across the correct output terminals.

Step 1: Identify the audio output
Determine whether you are testing a line output, headphone output, or speaker output.
On a typical stereo TRS connector, the tip and ring carry the left and right channels. The sleeve is usually the common connection. Connector wiring can vary, especially with TRRS jacks, so confirm the pinout before inserting the probes.
For a speaker output, measure between the positive and negative speaker terminals. Do not assume that the negative terminal is connected to chassis ground.
Step 2: Set up the multimeter
Insert the black test lead into the COM jack and the red lead into the VΩ jack.
Set the meter to AC voltage, which is usually marked as V~ on the dial. If the markings on your meter are unfamiliar, our guide to multimeter symbols explains how to identify the correct measurement mode.
If the meter is not auto-ranging, begin with a range above the expected output voltage. You can select a lower range after confirming that the signal is within a safe level.
Step 3: Play a steady test tone
A steady sine-wave tone gives a more stable reading than speech or music.
A 1 kHz tone is commonly used for general audio testing. Start with the equipment volume at a low setting, then increase it gradually.
Step 4: Measure the AC signal voltage
Place one probe on each of the two output terminals while the test tone is playing.
For a single-ended output, place the black probe on the confirmed signal ground and the red probe on the signal terminal. AC voltage does not have a fixed polarity, so reversing the probes should not materially change the displayed magnitude.
A stable AC reading indicates that a signal is reaching the test point. Compare the reading with the opposite channel or the manufacturer’s service data when available.
Step 5: Check for DC voltage
DC voltage mode checks the output’s bias or DC offset rather than the audio signal level.
Stop the test tone and reduce the volume. Change the multimeter to DC voltage, then measure across the same output terminals.
Some amplifier designs normally carry a DC bias on each output terminal. What matters is the voltage across the load and the expected behavior of that circuit. Consult the service manual before deciding that a DC reading indicates a fault.
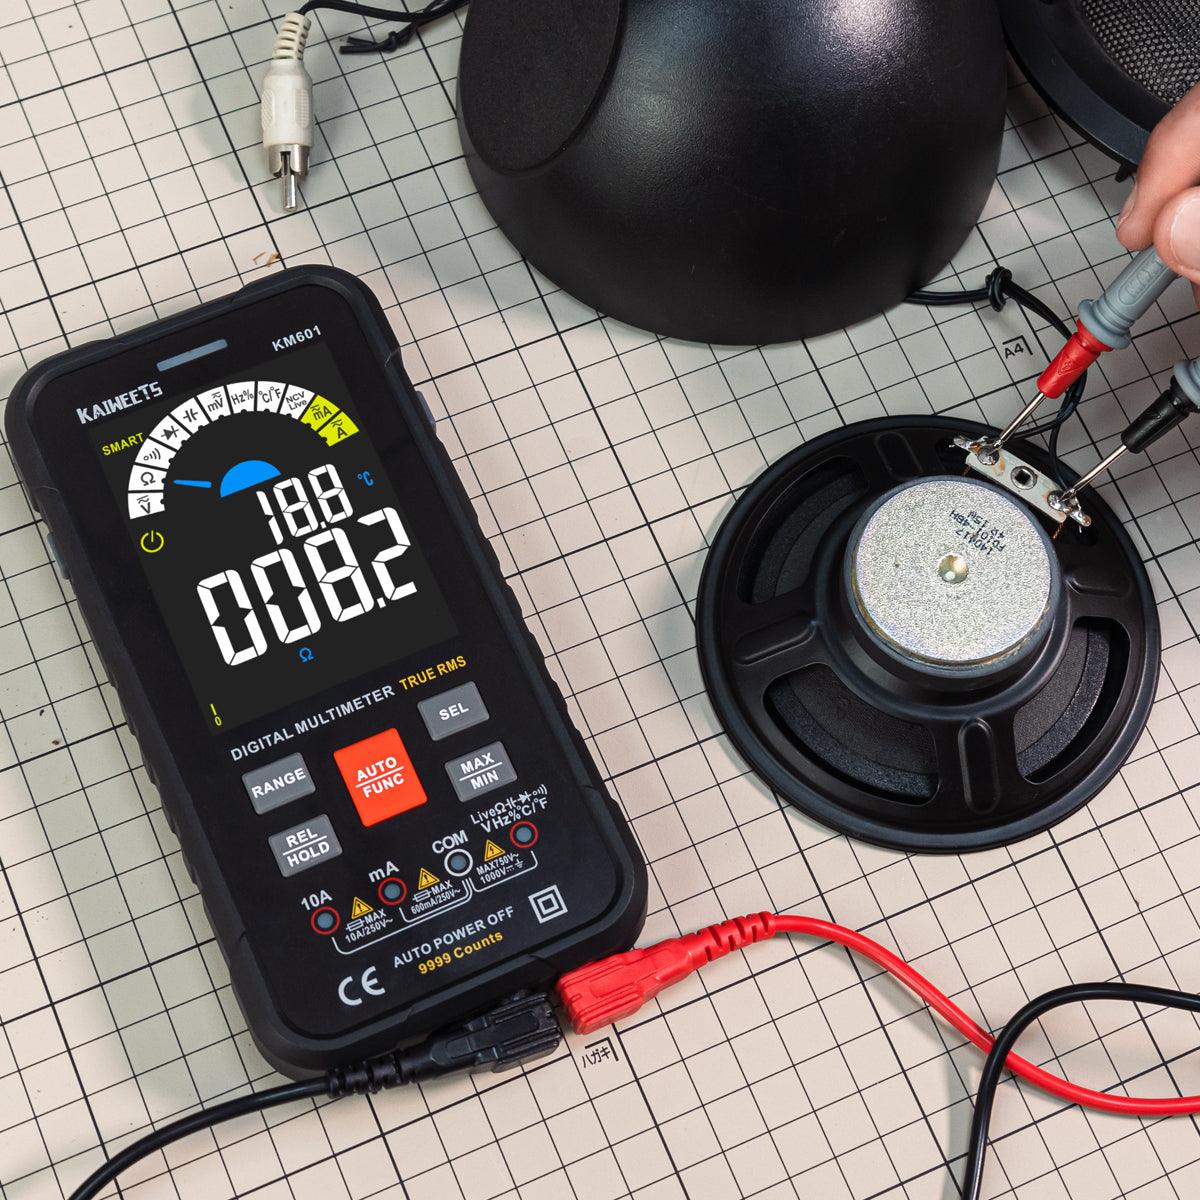
Step 6: Test cables or speakers with the power off
Continuity and resistance tests can help locate an open cable or damaged speaker voice coil.
Turn off the equipment and disconnect it from power. Isolate the cable or speaker from the amplifier before measuring it.
- A good cable should show low resistance from one end of a conductor to the other.
- There should be no continuity between conductors that are meant to remain separate.
- A working speaker usually shows a finite resistance rather than an open-circuit reading.
The measured DC resistance of a speaker is normally lower than its stated impedance. A resistance reading therefore does not provide a complete impedance measurement.
How should you interpret the multimeter reading?
The meaning of the result depends on the selected mode and the point being tested.
| Measurement | What the reading can indicate | Important limitation |
|---|---|---|
| AC voltage | Confirms that an audio-frequency voltage is present | Accuracy depends on the meter’s bandwidth and the signal waveform |
| DC voltage | Checks output bias or unexpected DC offset | Some differential outputs normally have DC voltage relative to ground |
| Continuity | Finds open cables, blown fuses, or broken connections | The circuit must be de-energized and isolated |
| Resistance | Checks whether a speaker voice coil appears open or shorted | DC resistance is not the same as AC speaker impedance |
| Frequency | Confirms the frequency of a stable test signal | The input level must meet the meter’s frequency-function requirements |
If the AC voltage changes sharply when the volume control is moved, the signal path is responding. If one stereo channel reads much lower than the other under the same conditions, the weak channel may have a connection or amplifier problem.
An unstable reading does not always mean that the equipment is faulty. Music changes continuously, and some multimeters update too slowly to follow it. Use a steady test tone before comparing channels.
Which audio problems can a multimeter help diagnose?
A multimeter is most useful for locating basic electrical faults rather than judging sound quality.
- No sound: Check for AC signal voltage at each stage of the signal path.
- One silent channel: Compare the left and right channel voltages using the same tone and volume.
- Intermittent audio: Test the cable for continuity while gently moving it.
- Blown fuse: Remove the fuse and check it with continuity mode.
- Suspected speaker damage: Disconnect the speaker and measure its DC resistance.
- Unexpected speaker movement: Check the amplifier output for abnormal DC voltage.
A multimeter cannot reliably identify clipping, phase errors, frequency-response problems, or low-level noise. These faults require a tool that can display or analyze the waveform.
When do you need an oscilloscope or audio analyzer?
You need more advanced equipment when the problem involves waveform shape, distortion, or detailed performance measurements.
Oscilloscope:
An oscilloscope displays voltage over time. It can reveal clipping, oscillation, noise, and intermittent signal loss that a multimeter may average into a single reading.
Use the correct probing method on differential or bridge-tied outputs. A grounded oscilloscope probe must not be connected directly to an amplifier terminal unless the circuit and measurement setup are designed for it.
Signal generator:
A signal generator provides a stable tone at a known frequency and level. This makes it easier to compare channels and trace the signal through an amplifier.
Audio analyzer:
An audio analyzer is designed for measurements such as frequency response and distortion. It is the better choice when you need performance data rather than a basic signal check.
Logic analyzer:
A logic analyzer is useful for digital audio interfaces or control signals. It is not normally used to measure an analog speaker or headphone signal.
Frequently Asked Questions
Can a multimeter measure audio quality?
No. A multimeter can measure electrical values related to the signal, but it cannot fully evaluate audio quality.
It may confirm that a signal is present or show that one channel has a lower output level. It will not reliably show clipping, harmonic distortion, or frequency-response errors. Use an oscilloscope or audio analyzer for those checks.
How can you tell whether an amplifier is faulty?
An amplifier may be faulty if it has no output, produces unequal channel voltages, or shows an unexpected DC voltage across the speaker terminals.
Other warning signs include repeated fuse failure, overheating, or protection mode activating without a connected speaker fault. Disconnect the load and follow the manufacturer’s service procedure before opening the amplifier.
Equipment connected to mains voltage can remain hazardous after it is unplugged because internal capacitors may retain a charge. Internal repairs should be handled by a qualified technician.
Should speaker wire have voltage?
Yes. Speaker wire carries an alternating voltage whenever the amplifier is producing sound.
The voltage depends on the amplifier output, volume setting, signal waveform, and speaker load. With no signal playing, the AC reading should normally be close to zero, although some Class D outputs may confuse meters that cannot reject the switching carrier.
What is an audio amplifier’s output voltage?
An amplifier’s output voltage varies with its output power and the connected load.
For a sine wave driving a resistive load, approximate RMS voltage can be calculated with:
VRMS = √(Power × Resistance)
For example, 100 watts delivered into an 8-ohm resistive load corresponds to about 28.3 V RMS. This is approximately 40 V peak for an unclipped sine wave.
A real speaker does not have constant resistance across all frequencies. The calculation is therefore an estimate unless the amplifier is tested with a suitable dummy load.
Can you test a headphone jack with a multimeter?
Yes, but a breakout cable or test adapter is safer than touching probes directly inside the jack.
Play a steady tone and measure AC voltage between the common connection and each channel. Keep the volume low at first. Avoid bridging adjacent contacts with a probe because this can temporarily short the output.
Why does the AC voltage reading change when music is playing?
Music does not maintain a constant signal level, so the multimeter reading will rise and fall.
The meter’s update rate and averaging method also affect the display. Use a steady sine-wave tone when you need a repeatable measurement.
Conclusion
A multimeter can confirm whether an audio signal is present and help locate basic electrical faults. Use AC voltage mode for the signal level and DC voltage mode for output offset. Continuity and resistance modes should only be used with the equipment powered off.
The most dependable results come from a steady test tone, correctly identified terminals, and a meter with suitable AC bandwidth. For waveform distortion or detailed audio performance, use an oscilloscope or audio analyzer instead.

Dig deeper:
Dejar un comentario
Todos los comentarios se revisan antes de su publicación.
Este sitio está protegido por hCaptcha y se aplican la Política de privacidad de hCaptcha y los Términos del servicio.